This repository (repo) provides a template for an Accounting / Finance research project. It covers the following steps using a very basic earnings persistence regression as an example:
- Installing Git and R
- Downloading data from WRDS using R OR SAS
- Saving data to a Stata file using R OR SAS
- Creating Figures using R
- Creating a full set of VERY PRETTY tables using R OR Stata
- Manual tables
- Cross-tab
- Descriptive Statistics
- Correlation Matrix
- Regression (with dynamic FE indicators, etc)
- Outputing the tables to LaTeX OR MS Office
- Overleaf LaTeX template included: https://www.overleaf.com/read/ctmwnmdcypzh
- Example PDF for the LaTeX tables
Table of Contents
- Introduction
- How to Use These Materials
- Getting Started with R and Git
- Forking This Repository
- Additional Resources
Introduction
The goal of this example is to help researchers go from zero to producing a publication-ready research document as quickly as possible. A secondary goal is to provide good table-formatting examples to assist PhD students and junior colleages in preparing nice-looking tables for our research projects. This website began as an example of how to code a basic research project entirely in R, but has expanded to provide equivalent code for users that prefer SAS or Stata.
My recommendation for managing your research project is to anchor your project in R, and manage your code on Github. Github offers private repositories for academic users if your code is proprietary. Github also offers great version control and search functionality. Your data can be stored and shared separately, perhaps using an online backup and file sharing service such as Dropbox or OneDrive. The example code in this repository gives examples for setting up references to a shared data directory with coauthors. R can easily read in both SAS and Stata files, and easily output to Stata if needed. Personally, I still do some of my initial data collection in SAS, and then move the data to R for analyses. I don’t enjoy working in Stata, but I have included a Stata version of the code for reference. You may encounter coauthors that are only comfortable collaborating in Stata. If you do your analyses and table creation in Stata, I recommend to at least learn a little bit of R for creating figures. Making figures in R is more intuitive than in Stata and the figures look nicer. You can read your Stata dataset into R and make some nice figures that will really enhance your research project.
I recommend writing your paper using LaTeX on Overleaf if possible. Overleaf is great for working with coauthors and having a “single version” of the paper with a history of all changes. LaTeX also offers many features for making your paper look nice and managing citations, etc. The Overleaf template included with this repo is its own resource for getting started in LaTeX. In addition to showing the example output of the tables generated in the code, it provides examples for adding citations, section headings, etc. You can copy the source code from Overleaf and paste it into your own Overleaf project or .tex file to get started. With that said, the American Accounting Association and many of your coauthors will prefer you to work in MS Word. This example project provides alternate code for outputing nice tables to MS Word and Excel. Sometimes I initially create rough tables in MS Word to email to coauthors, and then I move the tables into LaTeX / Overleaf once the project matures.
In this example project, I have put greater emphasis on the “last mile” of table creation and formatting as compared with “learning to code” or learning the ins-and-outs of various financial databases. Therefore, users may want to take a look at this example project, go somewhere else to get up to speed on their coding skills, and then come back when they are starting to output tables. I mainly use these example materials in conjunction with in-person instruction, so there might be parts that are not completely self-standing on the website. There is a very bare-bones attached slide deck with some of the discussion material that I cover in-person. Please always feel free to reach out to me with any questions about the material or suggestions for additional instructions. You can find my contact info on my university webpage, or use the GitHub “issues” or pull requests to collaborate.
How To Use These Materials
Please feel free to use these materials in your work or share them with others.
I recommend that you “fork” this repository to your own GitHub account and then “clone” the files down to a local folder on your computer (see below). This will help you understand Git, and you can customize the files as needed.
You can also download all of the files in the repo as a zip file by clicking here.
Of course, you can also simply browse through the code on GitHub in your web browser and either download or copy/paste any parts that are useful to you. If you are viewing this on the “.io” website, there is a “view in GitHub button above.” If you are viewing this on GitHub, the folder structure appears above this ReadMe content. You can also click the “Code” tab at the top of the page if needed.
Files are organized as follows:
- The src folder contains the relevant SAS, R, and Stata code
- The assets folder contains an optional RStudio theme and font, slide deck, website images, etc.
Citing Me
Please leave a link / attribution to this repository when sharing it with others. If you are able to work in a citation to one of my recent papers, that would help me out!
- Some of the code in this repo was developed for Bochkay et al. (2022), so it would be appropriate to cite it as a source of the coding examples:
- BOCHKAY, K., MARKOV, S., SUBASI, M. and WEISBROD, E. (2022), The Roles of Data Providers and Analysts in the Production, Dissemination, and Pricing of Street Earnings. Journal of Accounting Research, 60: 1695-1740. https://doi.org/10.1111/1475-679X.12457
- Code Appendix
- Alternately, you could cite my dissertation paper:
- WEISBROD, E. (2019), Stockholders’ Unrealized Returns and the Market Reaction to Financial Disclosures. The Journal of Finance, 74: 899-942. https://doi.org/10.1111/jofi.12743
Getting Started with R and Git
In order to “clone” (copy) this repository to your machine and run the R code, you will need to install Git, R, RStudio, and several R packages to your machine. I will provide the installation steps for a Windows machine, but the steps are very similar for MacOS or Linux.
- Install Git
- Follow the steps at this link: https://git-scm.com/book/en/v2/Getting-Started-Installing-Git
I think it is a good idea to allow this option to install git into your PATH so that RStudio can find it.
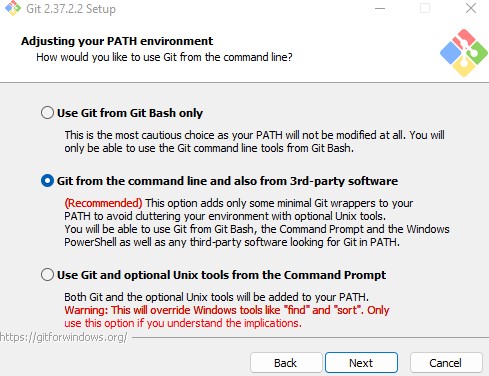
It is also helpful to allow git to install the credential manager to help with storing your github credentials.

- Finally, I also recommend to install / allow Git bash during the installation.
- Install R
- Before you install RStudio, you should first install R from the following link: https://cran.rstudio.com/
If you already have R on your machine, I recommend at least R version 4.0 or better to follow along with the code in this repo. If you use an older version of R, you may see some warnings about R packages being built with a different version, but usually everything will still work.
- Install RStudio
- Install RStudio Desktop from the following link: https://www.rstudio.com/products/rstudio/download/#download
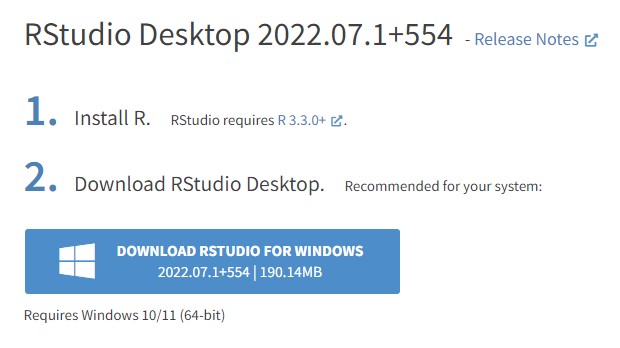
As shown in the screenshot, R should be installed first, as we did in the previous step.
- Sign up for a Github account
-
If you have not done so already, register for an account at https://github.com/
-
There are some benefits to linking your Github account to your school email (https://education.github.com/benefits).
-
Below, I recommend that you use the same primary email address that you use for github when you set your user.email in git.
- Open RStudio and set your Git credentials
- To work with Git, you need to set your user name and email.
- There are many ways to do this, but an easy way is using RStudio’s built-in terminal.
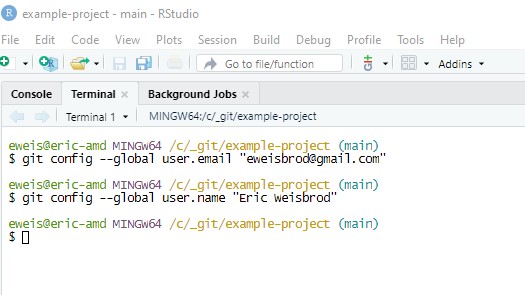
- Click on the “terminal” tab that should be next to console.
- Type the following commands
git config --global user.email "your@email.com"
git config --global user.name "Your Name"
- NOTE: If this step doesn’t work, don’t worry. Just keep going. This might not work if you did not install Git bash, but you should still be able to keep going.
Forking this Repository
The best way to work with this code and learn Git/Github is to fork your own version of this repo, and then clone it to your local machine in RStudio as a project with version control. A “fork” is basically your own version of this code repository that will live in your own GitHub account. You can read about the basics in the Github Documentation.
IMPORTANT: You will need to create a local directory to hold the local copy of this repository on your computer. DO NOT put this directory inside Dropbox. Dropbox and Git do not play well together unless you are an advanced user. I recommend to use a simple directory on your main drive that is easy to find. </b>
-
If you are reading this on the “.io” webpage, click here or the button above to view this page on GitHub.
-
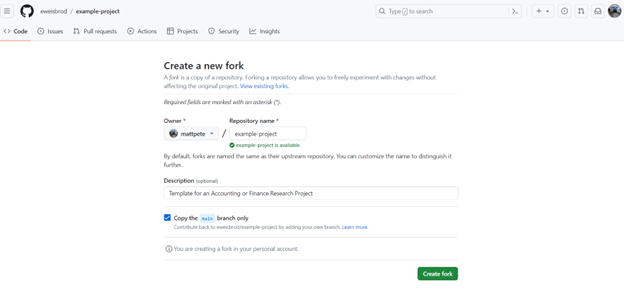
At the top of the github page, click the “fork” button, as shown in the screenshot (while signed into your GitHub account):
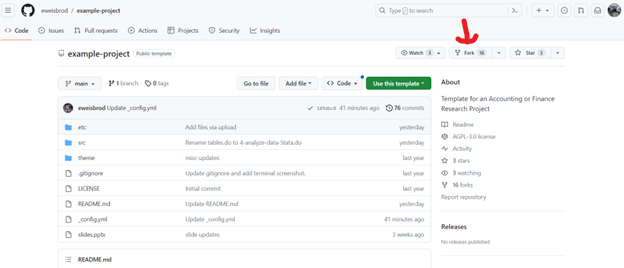
Follow the prompts to create your own version of this repo. You can rename it and change its description as desired.
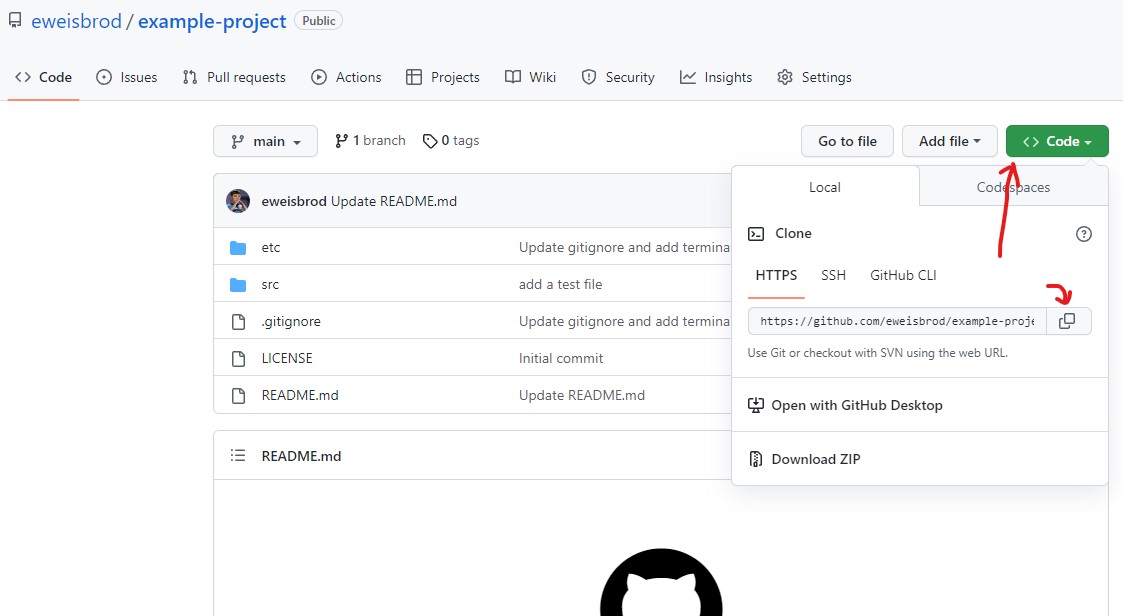
- Now go to YOUR version repo on GitHub. It should be something like “github.com/your-username/example-project.” At the top of YOUR page, click the green code button and copy the https link to this repo. AGAIN: do NOT click the code button on MY page, do it on your own repo! Your screenshot should have your name instead of mine!
-
In RStudio, click File -> New Project. On the next menu, click “Version Control” and choose Git.
-
Paste the URL into the box, as follows:
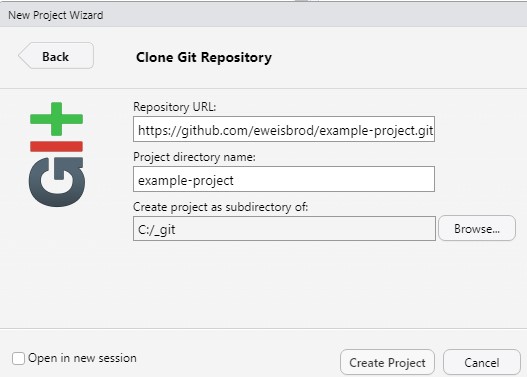
- Click “Create Project”
If you have successfully cloned the project, you should be able to see the list of files in the project in RStudio. These files are also saved on your computer in whatever folder you chose when you created the project.
- To get started with running the code and connecting to WRDS, you should open the “–Install-Packages.R” script in the “src” folder in RStudio.
- Run the commands in this file by highlighting them and pushing “ctrl+Enter” or by highlighting them and clicking “run.”
- If you are able to successfully connect to WRDS you should see a line like this output in your console:

If you were able to successfully install the packages and connect to WRDS, you should now be ready to follow along and run the remaining code.
Additional Resources
There are so many resources out there. I am sure I will leave out many great resources, but here are some to get started:
- https://wrds-www.wharton.upenn.edu/pages/support/sample-programs/ WRDS offers sample programs for working with various databases.
- https://iangow.github.io/far_book/ “Empirical Research in Accounting: Tools and Methods” by Ian Gow and Tony Ding is a great open-source textbook for learning research methods as well as some R programming. They also offer some tips on using an SQL database to store your research data instead of storing it in flat files.
- https://www.openassetpricing.com/ Very cool open-source asset pricing project with a lot of downloadable data and code.
- https://www.accountingcodingcamp.com/ offers paid online courses for learning SAS, Stata, and Python.
- https://happygitwithr.com/ reference material for learning to use Git in R.
- https://mlr3.mlr-org.com/ If you are interested in machine learning, the mlr ecosystem is interesting to check out and has a book in-progress to go with it. I think this is somewhat similar to the scikit-learn ecosystem in Python.
- https://www.tidymodels.org/ The “Tidyverse” also offers a machine learning ecosystem called tidmodels.
- https://www.futureverse.org/ The futureverse offers powerful packages for parallel processing in R. I have used it before. Contact me if you get interested in this. It is pretty powerful.
- https://docs.ropensci.org/targets/ I have not tried this, but if you are a person that likes to stay organized, I hear the Targets package in R is pretty cool for organizing the pipeline of your research project in R.
- https://rstudio.github.io/reticulate/ I don’t really use Python, but if you are a Python user, I hear this package for using Python INSIDE OF R is cool.